Google Pixel eSIM Guide: Setup And Best Travel Practices (2026)
Ever landed in a foreign country and spent your first hour hunting for a paperclip to pop open a SIM tray? It’s a classic travel headache that’s finally becoming a thing of the past. The Google Pixel has emerged as a powerhouse for international explorers, largely thanks to its sophisticated Google Pixel eSIM setup guide that lets you ditch physical plastic for a digital connection.
An eSIM is essentially a digital version of the traditional SIM card that’s already soldered into your Pixel’s motherboard. Instead of swapping physical cards every time you cross a border, you simply download a digital profile to stay connected. This guide breaks down everything from basic compatibility to the high-tech features arriving in 2026, including how to switch between multiple eSIM plans with zero downtime.
By the end of this post, you’ll know exactly how to manage Dual SIM Dual Active (DSDA) settings to keep your home number active while using local 5G data. We’ll also dive into Pixel-exclusive perks like software-based SIM transfers and backup calling, ensuring you bypass expensive roaming fees while maintaining top-tier speeds. Whether you’re navigating a new city with AI-powered switching or need a satellite backup in remote areas, your Pixel is built to handle it all.
How Google Pixel eSIM Technology Changes Travel
The Google Pixel has transformed from a simple smartphone into a sophisticated travel hub, largely because of how it handles digital connectivity. By integrating advanced eSIM hardware directly into the device architecture, Google has removed the physical barriers that used to define international roaming. You no longer have to worry about losing a tiny SIM card while swapping it on a cramped airplane tray or searching for a local kiosk in a terminal.
Instead, the Pixel uses intelligent software to manage multiple network profiles simultaneously; this allows the device to adapt to new environments the moment you touch down. The technology is designed to prioritize the fastest available connection, ensuring that your navigation and translation apps work without the lag typically associated with traditional roaming. For the modern traveler, this means a shift from reactive troubleshooting to proactive, automated connectivity.
Dual SIM Capabilities on Google Pixel
One of the most powerful features found in recent Pixel models is Dual SIM Dual Active (DSDA) technology. Unlike older systems that required you to manually toggle between networks, DSDA allows your Pixel to maintain two active connections at once. This means you can keep your primary home SIM active for receiving important two-factor authentication texts or emergency calls from family, while simultaneously using a local or international eSIM for all your high-speed data needs.
This setup is a total lifesaver for those who need to stay reachable on their original number without paying the exorbitant data rates often charged by home carriers. You can specifically assign your travel eSIM to handle “Mobile Data” in the settings, while keeping your home SIM as the default for “Calls” and “SMS.” This granular control ensures you never accidentally rack up a massive bill just because you checked a map or uploaded a photo to social media.
Pixels are remarkably flexible with how they handle these configurations. You aren’t strictly limited to one physical card and one digital one; current models allow you to use two eSIM profiles at the same time. This is perfect if you are hopping between countries and want to keep a regional plan active alongside a specific local plan for better local speeds.
Pixel Software Features for Global Roaming
Google has introduced several software-level innovations that make the eSIM experience feel incredibly intuitive. A standout feature is “Backup Calling,” which essentially turns your Pixel into its own Wi-Fi hotspot for your home SIM. If you are in a country where your home carrier doesn’t have great service, your Pixel can use the data from your travel eSIM to power “Wi-Fi Calling” for your home number. It’s a clever trick that ensures you can make and receive crystal-clear calls using your standard number even if there is no direct cell signal for that carrier.
The setup process has also been refined to remove the friction often found in mobile transitions. Google’s “Instant eSIM Transfer” tool is a massive time-saver for anyone upgrading their device while abroad or setting up a new plan. Instead of waiting for emails or manually typing in long strings of activation codes, the software can often pull the necessary data directly from your Google account or previous device to get you online in seconds.
To make the most of these features, it helps to have a solid understanding of the frequently asked eSIM questions regarding regional compatibility. By 2026, many of these processes are automated, with the Pixel’s AI-driven “Network Preferences” suggesting the most cost-effective way to stay connected based on your current GPS location and available signal strengths. It’s this high level of software integration that makes the Pixel a top choice for anyone who values a stress-free world connectivity eSIM comparison when planning their next adventure.
Confirming If Your Google Pixel Supports eSIM
Before you start hunting for a digital data plan, it’s vital to verify that your specific device is ready for the transition. While most modern Pixels are built with this hardware, regional differences and carrier locks can sometimes throw a wrench in the works. Checking for compatibility is a quick process that takes less than thirty seconds, saving you the frustration of purchasing a plan your phone cannot actually use.
Verification is the first step toward a paperclip-free travel experience. By looking into your system settings, you can see if the internal chip is active and ready to house new profiles. It is also a smart way to ensure your phone is unlocked, which is a common hurdle for those who bought their device through a traditional carrier contract.
How to Check eSIM Compatibility in Settings
The most reliable way to confirm your hardware status is through the Network menu. Google has tucked the eSIM activation portal inside the SIMs management area, and its presence is the ultimate green light for your digital journey. Follow these simple steps to find the “Download a SIM” option on your device:
- Open the Settings app on your Google Pixel.
- Select Network & internet from the list of options.
- Tap on SIMs or the plus (+) sign located next to the Mobile Network heading.
- Look for the prompt that asks Download a SIM instead? at the bottom of the screen.
If you see that specific text, your Pixel is officially eSIM-capable. If you don’t see it, your device might be an older model or a specific regional variant that lacks the necessary hardware chip. For those who need a bit more visual help, checking out step-by-step setup guides for travel eSIMs can provide additional context on what these screens look like across various Android versions.
Once you have confirmed compatibility, you’re ready to start exploring comprehensive eSIM activation walkthroughs for your next trip. Remember that even if the hardware is present, your phone must be carrier-unlocked to accept profiles from international providers like Gohub. If your phone was purchased outright from the Google Store, you are almost certainly good to go; however, if you are on a payment plan with a carrier, it’s worth a quick call to them to ensure they’ve “whitelisted” your device for third-party eSIMs.
Setting Up Your eSIM: A Step by Step Guide
Setting up your Google Pixel for a trip is remarkably fast these days. Since the 2026 models have moved entirely away from physical slots, the process is handled through digital handshakes. You can get connected while you are still taxiing on the runway or even before you leave home. The goal is to get your digital profile onto the device so that the internal antennas know which local network to talk to.
Whether you choose a hands-off approach through a dedicated travel app or go the traditional route with a scan, your Pixel makes the transition feel quite natural. Most travelers prefer to have their data ready to go the moment they land. This prevents that awkward scramble for airport Wi-Fi just to find a ride-sharing app. It is a simple matter of choosing the method that fits your level of technical comfort.
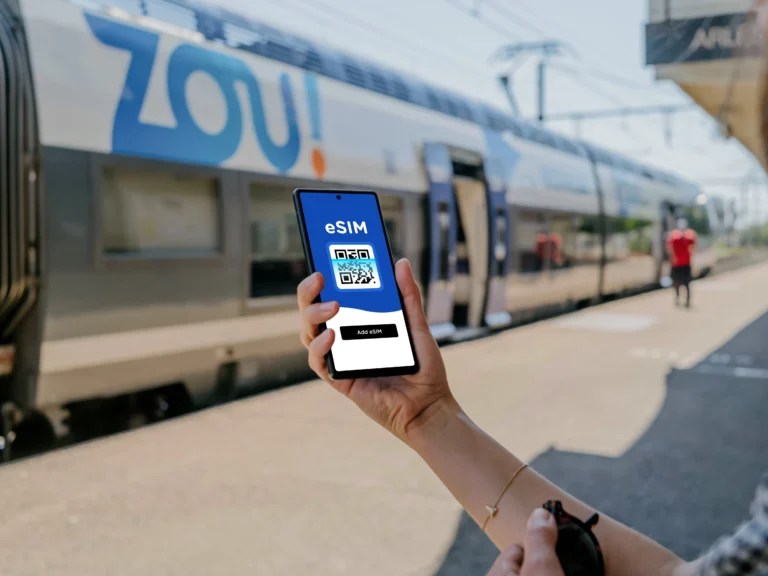
Adding an eSIM With a QR Code or App
The “One-Tap Installation” is the modern gold standard for convenience. When you buy a plan from a provider like Gohub through their mobile app, the software handles the heavy lifting for you. After picking your destination and data amount, a single button push prompts your Pixel to request the profile. A system notification pops up asking for your permission to add the plan, and with one tap, the “Tensor” AI chip configures the network settings in the background. It is an extremely slick experience that feels more like a software update than a cellular setup.
If you prefer a more manual approach or receive your plan via email, the QR code method is your go-to move. You can find this by heading into your settings menu. Open Network & internet, hit the plus sign next to SIMs, and select the option to download a SIM. Your Pixel opens its camera specifically to look for that digital key. Once you point the camera at the code (on another screen or a printout), the device immediately pulls the carrier information from the server. This method is incredibly reliable and works as a perfect backup if an app-based install fails to trigger.
Naming and Managing SIM Profiles
Once you have multiple profiles on your phone, things can get confusing if you don’t stay organized. Your Pixel allows you to give each SIM a custom label so you always know which one is currently burning through data. I highly recommend renaming these immediately after activation. It is a total no-brainer to label your primary line as “Home” and your temporary data plan as “Travel” or the name of the country, like “Japan Data.” This simple step prevents you from accidentally using your expensive home roaming data for a heavy video upload.
Managing these profiles is done through the same SIMs menu in your settings. You can toggle your travel profile on or off with a simple switch, which is great for saving battery when you are in an area with a stable Wi-Fi connection. You should also set your travel eSIM as the “Default for Mobile Data” while keeping your home line as the default for “Calls” and “SMS.” This configuration ensures you stay reachable for important texts from your bank or family without the risk of a massive data bill. If you find yourself juggling several destinations, you can even check out a comparison of international eSIM options to see which regional plans allow you to keep the fewest profiles active at once.
Configuring Dual SIM Settings to Avoid Charges
The real beauty of a Google Pixel lies in its ability to juggle two identities at once without breaking a sweat. By 2026, the software has become so sharp that you can practically dictate exactly how every kilobyte of data is spent. To keep your home carrier from slapping you with “accidental” roaming fees, you need to be intentional about your SIM assignments.
Think of your phone as a gatekeeper; it needs to know which gate to open for data and which to keep strictly for emergency texts or calls. If you don’t set these boundaries, your Pixel might default to the strongest signal, which could very well be your home SIM roaming on an expensive local partner network. Setting up a dual SIM with eSIM guide involves telling the device that your travel eSIM is the only authorized path for internet traffic.
Switching Data Lines and Network Selection
When you land and take your phone out of airplane mode, the Pixel generally does a great job of finding the right tower. However, if you find yourself staring at an “Emergency Calls Only” notification or a frustratingly slow 3G icon, it is time to take manual control. Automatic selection sometimes latches onto a legacy roaming partner of your home network instead of the high speed local network your travel eSIM is designed to use.
To override the system and force a better connection, you’ll need to head into your network settings. This is a common troubleshooting step that solves 90% of “no service” issues immediately after arrival. You can find the manual selection by following these steps:
- Navigate to Settings and select Network & internet.
- Tap on SIMs and choose your active travel eSIM profile.
- Scroll down and toggle off Automatically select network.
- Wait for the list of available carriers to populate, which can take up to a minute.
- Select the specific local carrier recommended by your eSIM provider.
Once you have manually picked the right network, your Pixel will prioritize that connection. If the signal remains unstable, some users in 2026 find that switching the “Preferred network type” from 5G to LTE provides a much more consistent experience in areas where 5G rollout is still spotty. This small tweak can prevent your phone from constantly searching for a weak 5G signal, which not only keeps you connected but also saves a massive amount of battery life during those long days of sightseeing.
 Photo by Andrey Matveev
Another vital setting is the Mobile Data toggle within the SIMs menu. You must ensure that your travel profile is the only one with this enabled. Your Pixel also features a “Data Switching” option that allows the phone to use the second SIM if the first one has poor coverage. To avoid surprise charges, I strongly recommend keeping this feature turned off while abroad. This ensures that if your travel eSIM loses signal, the phone won’t sneakily switch back to your home SIM’s expensive data to fill the gap.
Best Travel Habits for Pixel Users
Nailing your connectivity is only half the battle when you’re moving through different time zones and scanning digital boards at a train station. To really master your Pixel on the road, you’ve gotta treat it like the high performance tool it is. By 2026, these devices have become almost too smart for their own good, but that means they’re constantly working in the background. If you want to avoid that late-afternoon panic where your battery hits 5% right when you need to call a ride, you need a solid strategy for managing your resources.
Travelers often overlook how much work a phone does to keep two different network signals alive at once. It’s a heavy lift for the hardware. Beyond just the data, how you interact with your settings can make the difference between a phone that lasts all day and one that leaves you stranded. Getting these habits down converts your Pixel from just a smartphone into a reliable piece of travel gear that doesn’t quit on you.
Battery and Data Management Skills
One of the most effective moves you can make is turning off your primary home SIM when you’re in low-signal areas. When your Pixel is hunting for two different signals (your roaming home line and your local travel eSIM) and the reception is spotty, it drains power at an alarming rate. The phone is essentially screaming at towers that are too far away, trying to maintain two identities at once. If you’re deep in a stone cathedral or hiking through a rural valley, just toggle that home line off. You’ll save a massive chunk of battery life because the modem only has to focus on one stable connection.
Your Pixel’s Travel Hub is another massive asset for keeping your usage in check. It’s a dedicated space that keeps your data spending transparent so you don’t get hit with a “data depleted” notification in the middle of a navigation route. I always suggest pairing this with the “Low Data Mode” during heavy sightseeing days. This software tweak blocks background apps from sucking up your travel data for things you don’t care about, like app updates or cloud photo syncs. It keeps the pipe open for the stuff that actually matters, like Maps and Translation.
To squeeze every drop of performance out of your device, check out these quick power-saving wins:
- Switch to LTE in remote areas: Even though 2026 Pixels have great 5G Standalone support, 5G can still be a battery hog if the local towers aren’t perfectly optimized. Dropping to LTE provides a rock-solid, efficient connection that is plenty fast for maps and messaging.
- Set a data warning: Go into your network settings and set a limit that’s about 10% lower than your actual plan. This gives you a “buffer zone” to find a Wi-Fi spot or top up your plan before you’re completely cut off.
- Use Offline Maps: This is an old-school trick that still rules. Download your city map on Wi-Fi at the hotel. Your Pixel will use the downloaded data first, saving both your battery and your precious travel eSIM gigabytes.
If you ever run into a situation where you’ve burned through your data too fast, don’t sweat it. You can always fix common eSIM issues by checking your background usage or simply restarting your eSIM plan to refresh the connection. These habits ensure your Pixel stays as sharp as your itinerary, keeping you connected without the hardware burnout.
Solving Common Pixel eSIM Problems
Even with the high tech improvements in the 2026 Pixel lineup, you might run into a few digital hiccups. It’s frustrating when you are standing in a busy airport and your data won’t kick in, but most of these issues are just software ghosts that are easy to bust. Whether it’s a security block or a simple timing error, these fixes will get your connection back on track so you can get back to your trip.
If you see a “Could Not Download Profile” error, check your phone’s clock first. Your Pixel needs the time to be perfectly synced with the network servers to establish a secure link. Go to your settings and make sure “Set Time Automatically” is toggled on. Another common culprit is an active VPN. If you use Google One or any third-party privacy tool, turn it off temporarily. VPNs often scramble the handshake between your phone and the carrier, causing the installation to fail before it even starts.
For those rare moments when you have a signal but no internet, a network reset is the ultimate “have you tried turning it off and on again” for the digital age. You can find this under Settings > System > Reset options > Reset Mobile Network Settings. This wipes out the glitchy configuration files without touching your photos or messages. It’s a total lifesaver for clearing out old data that might be clogging up your new travel profile.
Manually Setting APN for Better Connectivity
Most eSIMs configure themselves the moment they touch a local tower, but occasionally, you have to roll up your sleeves and do it yourself. This usually happens when your Pixel connects to a carrier but the data icon refuses to show up. The Access Point Name (APN) is the digital gateway that tells your Pixel how to access the internet through a specific provider. If this gateway is empty or wrong, your phone is basically shouting into a void.
Setting this up manually is a straightforward process that takes about two minutes. You will typically find the correct APN settings in the confirmation email from your eSIM provider or on their support page. To enter these details on your Pixel, follow these steps:
- Open Settings and tap Network & internet.
- Select SIMs and tap on your active travel eSIM.
- Scroll to the bottom and select Access Point Names.
- Tap the + (plus) icon or the three dots to create a new APN.
- Enter the Name and APN exactly as provided by your carrier.
- Tap the three dots in the corner and hit Save.
Once you save the profile, make sure the radio button next to your new APN is selected. You might need to toggle Airplane Mode on and off to force the phone to use the new settings. This manual tweak is the most reliable way to bypass “no data” bugs and ensures your Pixel is communicating perfectly with the local infrastructure. Taking these small steps manually is often faster than waiting for a support chat to reply while you’re trying to find your hotel.
Conclusion
Setting up your Google Pixel for international travel is no longer a chore involving paperclips and plastic shards. By embracing eSIM technology, you gain immediate access to local networks while keeping your home number active for those essential authentication texts. The shift toward software-based connectivity in 2026 makes switching carriers as simple as changing a wallpaper, providing both significant cost savings and the security of a digital-first setup.
Whether you are using manual APN tweaks to boost performance or relying on the automated switching of the latest Pixel models, you are now equipped to stay online without the sting of roaming fees. Before your next departure, I recommend you check eSIM activation speeds to ensure your data is ready the moment your wheels touch the tarmac.
Which feature are you most excited to try on your next trip? Safe travels and enjoy the freedom of truly global data.