How To Avoid Hidden Fees When Buying A Travel eSIM
A travel eSIM is effectively a digital version of the physical SIM card you’ve used for years, allowing you to bypass plastic chips by downloading local data network access directly onto your smartphone. While these digital profiles offer incredible convenience for hopping across borders, they aren’t always as cheap as they look on the surface. In fact, many travelers find that hidden fees can quickly turn a budget-friendly data plan into a surprisingly expensive headache if they don’t know where to look.
This guide covers exactly how to spot those sneaky charges, ranging from unexpected activation traps to “unlimited” data claims that aren’t actually unlimited. We’ll break down the essential attributes you need to watch for, including pricing transparency, regional coverage gaps, and strict data limits. If you’ve ever wondered how to stay connected without getting scammed, the short answer is to always read the fair usage policy before clicking buy.
To help you find a reliable connection, it’s worth comparing the best eSIM websites to see which providers prioritize honest pricing over flashy, misleading ads. By understanding how these digital plans operate, you can protect your wallet and enjoy your trip without the stress of “zombie” subscriptions or inflated top-up costs. Whether you are headed to one country or planning a global tour, a bit of prep goes a long way.
Why Hidden Fees Are the Biggest Trap With Travel eSIMs
Many travelers get lured in by a low sticker price only to realize the final cost is significantly higher once the digital profile is actually active. The main reason hidden fees are so dangerous is that they are often buried in dense legal jargon or fair usage policies that most people skip over during a quick purchase. Unlike a physical SIM card where you can walk back to a booth to complain, an eSIM is a digital product; once you pay and download the profile, getting a refund for “unexpected” charges is notoriously difficult.
The Problem With Deceptive Unlimited Data Claims
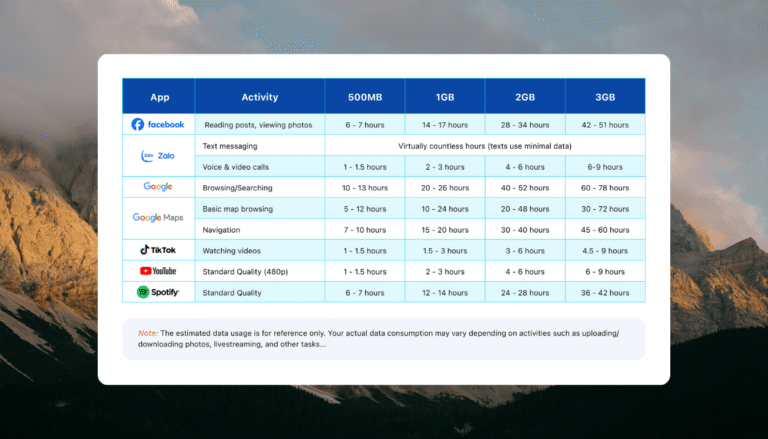
One of the most frequent traps involves the marketing of unlimited data plans that aren’t actually unlimited. In reality, these plans often come with a strict Fair Usage Policy (FUP) that caps your high speed data at a very low threshold, such as 1GB or 2GB per day. Once you hit that ceiling, your connection speed drops to a crawl, making it impossible to use navigation apps or load basic web pages.
To avoid this, you should always look for the fine print regarding speed throttling. If a provider doesn’t clearly state the point at which your speeds will be reduced, they are likely hiding a restrictive cap. It is often better to choose a plan with a fixed data amount so you know exactly what you are paying for without any performance surprises.
Common Surcharges And Activation Traps
While the advertised price might look like a steal, several providers add secondary costs at the final checkout screen or even after the service has begun. These can range from one-time “digital connection fees” to regional taxes that weren’t included in the initial quote.
- Initial Setup Fees: Some apps charge a $5 to $10 fee just to generate the QR code, which can double the cost of a small data bundle.
- Service Surcharges: These are often added as a percentage of the total, appearing only seconds before you authorize the payment.
- Top-Up Premiums: Adding data to an existing eSIM can sometimes cost more per gigabyte than the original purchase.
Checking for these costs beforehand is vital to staying within your travel budget. Using affordable prepaid global eSIM options from transparent providers remains the best way to ensure the price you see is the price you actually pay.
Automated Renewals And Expiration Issues
Another sneaky tactic involves “Auto-Top Up” settings that are enabled by default within travel apps. If your data runs low, the system automatically bills your credit card for another bundle without sending a notification. This can lead to a series of charges that you only discover after you have returned home and checked your bank statement.
Furthermore, many providers have shortened the lifespan of “account credits.” If you buy a larger amount of credit to use for future trips, these funds may expire in as little as 30 to 60 days. This practice effectively turns your balance into “use it or lose it” money, which is a major pain point for infrequent travelers. Always go into the app settings immediately after installation to disable auto-renewals and verify the expiration dates of any pre-purchased data or credits.
The High Cost Of Device Incompatibility
Not every phone is compatible with every eSIM network, and providers are increasingly refusing to offer refunds for technical mismatches. Many companies categorize these failed connections as “user error” or charge a “technical processing fee” to cancel the order. This means you could end up paying for a service you cannot even use.
Before buying, it is essential to verify that your specific device model is supported by the provider’s network in your destination. If you are heading to North America, checking for cheapest eSIM plans for USA that offer a compatibility checker is a smart move. Always take a screenshot of the advertised terms and any compatibility promises so you have evidence in case you need to dispute a charge with your bank.
Common Hidden Fees to Watch for Before You Buy
Spotting a great deal on a travel eSIM feels like a major win until the checkout screen reveals a different story. While the digital nature of these plans suggests lower overhead, many providers have introduced clever surcharges to pad their margins. These costs often remain invisible until you are deep into the transaction or, worse, after you have already arrived at your destination and lack other connectivity options. Understanding these pricing tactics is the only way to ensure your “budget” data plan doesn’t end up costing more than traditional roaming.
Digital Activation and Account Maintenance Fees
It is a common misconception that digital products carry zero distribution costs, and some eSIM providers exploit this by adding an activation fee at the final step of your purchase. You might see a plan advertised for $10, but as you hit the pay button, an additional $5 to $10 surcharge appears. This is often framed as a “line setup” or “digital connection fee” despite the fact that no physical hardware is being shipped and the process is entirely automated. For smaller data bundles, this single charge can effectively double your expected expenses.
Looking toward 2026, a frustrating new trend involves “Account Maintenance Fees” for keeping your profile active within a specific provider’s app. Even if you aren’t currently traveling or using data, some companies have begun deducting a small monthly balance from your digital wallet just to maintain your account history and saved payment methods. This “use it or lose it” mentality means that any leftover credits from a previous trip could slowly bleed away before your next adventure begins.
The Hidden Cost of Auto-Renewals and Silent Top-Ups
Convenience often comes with a price tag, particularly when it comes to “Auto-Top-Up” features that many travel apps enable by default during installation. These systems are designed to monitor your data usage and automatically charge your linked credit card for a new bundle once your current balance hits a specific threshold, usually 10%. While this prevents you from losing a map connection in the middle of a busy city, it also removes your ability to control exactly how much you spend on a trip.
You should make it a habit to dive into your app settings immediately after your first purchase to verify these toggles. If you aren’t careful, a background app update or a few high-definition video syncs could trigger multiple charges without a single push notification hitting your screen. Managing your budget requires active oversight, so it is usually safer to manually top up when you actually need more data. This prevents “zombie” subscriptions from following you home long after your vacation has ended.
When planning your next trip, it helps to understand the cost of travel eSIM vs local SIM setups, as local physical cards rarely have the same auto-billing risks. To stay ahead of these charges, consider the following steps:
- Disable Auto-Refill: Turn off any settings that allow the app to bill your card without manual authorization.
- Set Data Alerts: Use your phone’s built-in data tracker to receive an independent warning before you hit your limit.
- Review Pre-selected Toggles: Watch out for pre-checked boxes during checkout that opt you into “premium” support or insurance.
- Check Credit Expiry: If you load a digital wallet, verify if those funds expire within 30, 60, or 90 days.
Understanding eSIM Pricing Terms That Hide Extra Costs
Getting a handle on eSIM pricing requires looking past the bold numbers on the landing page. Many providers use industry specific shorthand to mask the true cost of their service, making it difficult to compare plans side by side. By the time you land and realize your connection is barely functional, you’ve already paid the bill. To protect your travel budget, you need to recognize how specific terms like “unlimited” and “activation” are defined in the fine print.
What Unlimited Data Really Means (The FUP Trap)
The term “unlimited data” is one of the most persistent illusions in the travel tech world. In reality, almost every nomadic data plan is governed by a Fair Usage Policy (FUP). This policy serves as a legal loophole that allows providers to advertise infinite connectivity while strictly limiting your high speed access.
Most travelers believe they can stream, navigate, and upload without consequence, but an FUP often dictates a daily cap of 1GB or 2GB. Once you cross this threshold, the provider doesn’t cut you off; it throttles your speed to 2G levels, usually around 128kbps. At this speed, modern apps like Instagram or Google Maps become completely nonfunctional, effectively “stranding” you until the clock resets at midnight.
Providers often use this artificial slowdown to push “Speed Boosts” or “Extra Data” packs. You are essentially forced to pay a second time to regain the 4G or 5G speeds you thought you already purchased. To stay safe, ignore the “unlimited” label and hunt for the specific daily high speed limit. If you can’t find a clear number, the provider is likely hiding a very aggressive throttling policy.
The Expiration Date Countdown
Timing is everything when it comes to digital SIM cards, yet many users lose money because they misunderstand the “validity window.” There is a massive difference between the installation window and the usage window, and failing to distinguish them can lead to an expired plan before you even leave your home country.
The installation window is the timeframe you have to add the eSIM to your phone after purchase. The usage window is the actual duration of the data plan (e.g., 7, 15, or 30 days). A common complaint among travelers is the “Purchase Activation” trap. Some cheaper providers start the 30-day countdown the second you pay, rather than waiting for you to connect to a local tower in your destination. If you buy your plan a week before your trip to be organized, you might arrive to find 25% of your paid time has already vanished.
To avoid this, look for plans that specify “Activation on First Connection.” This ensures your timer only begins when you physically land and the eSIM pings a local network. You can see how these details play out in an Uzbekistan eSIM plan comparison where timing and local network triggers are clarified for travelers.
- Activation Upon Purchase: The timer starts immediately; best for last-minute buys.
- Activation Upon Installation: The timer starts when you scan the QR code; do not do this until the day of travel.
- Activation Upon Network Connection: The gold standard; the timer only starts when you land and turn on the line.
Always verify these triggers in the product description to ensure you aren’t paying for days you spend at home packing your bags. Missing this detail is one of the quickest ways to see your travel funds disappear into thin air.
How to Read an eSIM Plan Page Like a Pro
Navigating a provider’s website can feel like walking through a minefield of marketing buzzwords designed to distract you from the actual costs. To me, the key to winning this game is ignoring the big, colorful banners and heading straight for the “Technical Specifications” or “Plan Details” section. This is where providers are legally required to list the specifics of what you are buying, including network partners and speed caps. If a page is light on details and heavy on lifestyle photography, that is your first red flag.
Decode The Network Type And Coverage Quality
The first thing you must check is which local operator the eSIM connects to, as not all networks provide equal service. A plan might offer a massive amount of data for a low price, but if it only connects to a secondary or “budget” carrier, you might find yourself with zero signal once you leave the city center. Top-tier providers will usually list the specific local networks they use, such as Telus in Canada or T-Mobile in the USA.
You also need to look for the generation of data being offered. In 2026, 5G is the standard, yet many discount eSIMs still funnel users through 4G or even 3G “roaming” agreements to save on costs. If the plan page does not explicitly mention 5G access, you should assume you are getting slower speeds. Furthermore, check if the plan allows for data sharing. Some budget plans include a “No Hotspot” clause, meaning you cannot tether your laptop or share your connection with a travel partner, which can be a massive inconvenience.
Master The Math Of Data Validity Versus Purchase Dates
One of the most expensive mistakes a traveler can make is misunderstanding when the “clock” starts ticking on their plan. To avoid losing days of service, you must identify the specific activation trigger listed on the product page. Most professional-grade plans offer several different activation styles:
- Activation on First Connection: This is the most user-friendly option where the validity period starts only when your phone pings a tower in the destination country.
- Activation on Installation: This starts the moment you scan the QR code; if you set up your phone while still at home, you are literally burning through your paid days before the trip starts.
- Activation on Purchase: The timer begins the second your payment clears; this is common with some low-cost providers and is a major trap for organized travelers who book weeks in advance.
To stay organized, I recommend reviewing an eSIM data tracking and top-up guide to see how different triggers impact your ability to manage your data. Knowing exactly when your plan expires ensures you don’t find yourself without a connection on the final, most stressful day of your journey.
Identify Transparent Pricing And Hidden Surcharges
A professional traveler never looks at the price on the search results; they look at the final total on the checkout page. Many providers use a tactic called “drip pricing,” where the initial price looks like a steal, but extra fees are added during the checkout process. These can include digital convenience fees, local taxes, or even “platform access” charges.
| Fee Type | What It Covers | Red Flag Level |
|---|---|---|
| Activation Fee | One-time cost to generate the digital profile. | High (Should be free) |
| Transaction Fee | Cost for processing international credit cards. | Medium (Use a travel card) |
| Top-Up Premium | Increased cost per GB for adding data later. | High (Buy what you need upfront) |
| Auto-Renew | A recurring charge that bills monthly. | Critical (Always toggle this off) |
Before you hit “buy,” check if the plan includes a local phone number or if it is “Data Only.” Many travelers accidentally buy a data-only plan and then realize they cannot receive a text for a ride-sharing app or a bank verification code. If you need 2FA (Two-Factor Authentication) capabilities, ensure the plan page explicitly mentions SMS or voice support. Taking sixty seconds to scan for these details can save you fifty dollars in unexpected roaming or top-up costs later on.
Comparing eSIM Providers Without Getting Misled
Selecting a travel eSIM requires looking past the glossy marketing and bold price tags. In my experience, the lowest price on a search results page rarely tells the whole story of what you will actually pay or the quality of the connection you will receive. To avoid frustration once you land, you have to verify the specific attributes of a plan, such as network priority and the actual source of the data. Determining whether a provider is a direct carrier partner or a third party aggregator is often the difference between a smooth 5G connection and a week spent staring at a loading screen.
Price Per GB vs Real Usable Data
Many travelers fall for the trap of choosing a plan based solely on the lowest cost per gigabyte, but this metric is often a red flag for poor service quality. A $2 per GB plan might look like a steal compared to a $5 per GB option, yet the cheaper plan is frequently plagued by high latency or heavy throttling. Latency happens when your data has to travel through a server half a world away before reaching your phone, causing a massive lag that makes video calls or navigation apps nearly impossible to use.
If a provider offers an unbelievably low price, they are likely using “tier two” or “tier three” roaming agreements. These agreements place your data at the bottom of the priority list on local towers. When the network gets busy, your speeds will be the first to be cut. In fact, choosing better value travel eSIMs often means paying a slightly higher upfront cost for a “tier one” connection that offers lower latency and consistent speeds even in crowded areas.
- Check Server Locations: Ensure the provider has local or regional breakout points to keep latency low.
- Identify Network Partners: Look for plans that name-drop premium carriers like AT&T, Vodafone, or KDDI.
- Spot Throttling Clauses: Even “fixed” data plans can have speed caps hidden in the fine print if you use a lot of data in a short window.
Direct Providers vs Resellers and Aggregators
Understanding who you are actually buying from is a major part of staying connected without hidden headaches. Direct providers are often local telecommunications companies or established global entities that own their own network infrastructure. Aggregators and resellers, on the other hand, buy data in bulk from these carriers and repackage it for travelers. While aggregators often have the slickest apps and the most countries listed, they act as a middleman that can complicate your experience.
Buying from a reseller sometimes means slower technical support because the company has no direct control over the network. If your signal drops, the reseller has to open a ticket with the actual carrier, leaving you stuck in the middle. Furthermore, these companies often add “digital convenience fees” or middleman markups that aren’t always transparent in the initial quote. When you compare Saily with other eSIM providers, you can see how different brands balance these service levels and pricing models.
- Direct Carriers: Typically offer the best speeds but might have more complex apps or registration requirements.
- Global Aggregators: Provide a one stop shop for 190+ countries with great UI but may have higher latency.
- Local Specialists: These are often the gold standard for specific regions, offering local phone numbers and 5G access that global resellers can’t always guarantee.
Always prioritize providers that offer 24/7 human support rather than just a chatbot. If a connection issue arises while you are trying to find your hotel at midnight, a direct line to someone who can reset your profile is worth the extra couple of dollars. Comparing top Saily eSIM alternatives for 2025 is a great way to see which companies prioritize this level of service over just being the cheapest option on the block.
Real Travel Scenarios Where Fees Sneak In
While browsing a polished website for travel data feels straightforward, the actual experience of using an eSIM across borders or sharing it with friends is where the “fine print” truly comes to life. It is easy to assume that digital data is a uniform commodity, but the architecture of these plans often includes hidden switches that can trigger extra costs when your behavior deviates from a very narrow path. To me, the most frustrating part is that these charges usually hit when you are most vulnerable, like when you are navigating a new city or trying to finish a work task on a train.
The Multi-Country Border Crossing Risk
If you are planning a multi-stop itinerary, perhaps hopping through Southeast Asia or touring the European Union, the “Global” daily plan is frequently a massive financial trap. These plans often lead with a low entry price but tack on exorbitant daily fees, sometimes reaching $10 per day, just for the privilege of keeping the line active across different borders. In contrast, regional bundles are almost always the smarter, more transparent choice for those moving between neighboring countries.
For example, if you are looking for the best data plans for Malaysia and plan to also visit Singapore, a regional “Asia” plan provides a single bucket of data with a fixed price. Global daily plans often operate like old-school roaming, where every new country trigger acts as a fresh billing event. You might inadvertently pay for multiple daily “access fees” in a single 24-hour window if your train crosses two borders. I always tell travelers to stick to regional fixed-data packages; they offer a predictable cost structure and prevent the “daily rip-off” that accompanies many touted global profiles.
Tethering and Hotspot Limitations
Sharing your internet connection should be a basic right in 2026, yet many budget eSIM providers have started implementing “Premium Sharing” fees or outright hotspot bans. This is a classic “gotcha” for digital nomads or families. You buy a 20GB plan thinking it is plenty for your phone and laptop, only to find that the “Personal Hotspot” toggle on your iPhone is grayed out or leads to a landing page demanding an extra $2 per day to unlock tethering.
Some plans go a step further by offering “Unlimited” data on the phone but strictly capping hotspot usage at a tiny fraction, like 500MB per day. Once you hit that cap, the hotspot dies while the phone keeps working, forcing you to buy a “sharing add-on” just to get your laptop back online. When you are reviewing frequently asked eSIM questions, always look for a “Hotspot Support” confirmation in the technical specs.
- Check for “Tethering Prohibited” clauses: Many “unlimited” plans explicitly block this in the fine print.
- Verify separate data caps: Your main data pool and your hotspot pool might not be the same.
- Watch for speed drops: Some providers allow hotspotting but throttle the shared connection to 3G speeds while keeping the phone on 5G.
If a plan does not explicitly say “Hotspot included” or “Data sharing allowed,” it is safe to assume there is a barrier in place. Paying an extra $5 upfront for a plan that allows sharing is significantly cheaper than being forced into daily $2 “sharing fees” once you have already landed and realized your laptop is a paperweight without a connection.
How to Avoid Hidden Fees Step by Step
When you buy a travel eSIM, you expect simplicity and savings. That is the whole selling point over using your home carrier’s roaming rates, which can feel like highway robbery. However, many providers play pricing games, pushing extra costs onto you right at the finish line or long after you have returned home. To truly beat hidden fees, you must shift your mindset from hunting for the lowest upfront price to demanding total cost transparency before you commit. Getting caught out by unexpected charges defeats the entire purpose of getting a digital plan. This section walks you through the specific checkpoints you need to verify to keep your spending exactly where you budget for it. Becoming a proactive traveler who reads the fine print like a lawyer reads a contract is the only way to stay protected.
Decoding the Unlimited Data Promise
One of the most frustrating traps involves the “Unlimited” label; frankly, labeling something unlimited when it has significant restrictions is misleading marketing. Nearly every travel eSIM service that advertises unlimited data operates under a Fair Usage Policy (FUP). If you see unlimited data without a clear explanation of what happens after a certain usage point, consider that data premium, not truly unlimited.
You need to investigate specific details regarding speed reduction:
- Daily Throttle Limit: Check the exact amount of high-speed data you receive each day. This is often low, sometimes only 1GB or 2GB. Once you hit this, your speed drops sharply.
- Speed After Throttling: Know the resulting speed. If it drops to 128kbps, you won’t be able to load video or even moderately complex websites. That is effectively no internet for modern travel needs.
- Reset Time: Determine if the cap resets every 24 hours or based on your purchase time. A 24-hour reset is usually better for heavy use days.
Instead of chasing the unlimited banner, look for plans with a generous, fixed data allocation that matches your typical usage. While these aren’t endless, the performance is guaranteed for that amount, which is far more predictable than dealing with sudden slow-downs. If you are in a country like Canada, where connectivity costs can be higher, verifying the speed priority on your chosen network is even more important to avoid slow-downs during peak times.
Scrutinizing Activation Triggers to Protect Plan Validity
The concept of time is where many travelers lose prepaid value without realizing it. When you purchase a travel eSIM, the countdown on its validity period can start at three different points, and only one of them usually benefits you. Being proactive here saves days of paid service going unused. Always look for confirmation that the validity period begins upon network connection.
You must confirm the activation trigger with the seller before purchase. If a page is vague, that is a reason to choose another provider; ambiguity signals potential hidden fees.
- Activation on Purchase: The timer starts the second the payment clears. If you buy a 7-day plan a week before departure, you start your trip with zero days left.
- Activation on Installation: The timer begins when you scan the QR code and add the profile to your phone. Setting this up the night before leaving means you use up a fraction of your plan waiting for your flight.
- Activation on First Connection: This means the validity timer only starts once your phone connects to a local tower in your destination. This is the gold standard for pre-purchasing and travel convenience.
Make sure you double-check if the provider offers plans that support activation upon first connection, especially if you are purchasing your eSIM weeks in advance for a trip covering multiple regions. If you are focused on the cheapest plans, you often find they default to the activation on purchase model, so keep your eye on that specific detail.
Identifying Fees Applied After the Initial Purchase
Even after you have paid the initial sticker price, a few additional charges can appear, often when you are most desperate for data. These are usually framed as operational costs that the provider claims are necessary for delivering a digital service. The most common culprits are digital setup fees and account management surcharges.
Some fees are added during a complex checkout process or as small recurring charges if you leave a credit card on file. For instance, some apps charge a line provisioning fee just to generate the unique QR code necessary for activation. Since the work is automated, this fee serves no functional purpose for the user other than increasing the provider’s profit margin.
To combat this, adopt a rigorous checkout review process:
- Final Cart Review: Before entering payment details, review the itemized list. Look for any line item that doesn’t clearly state data cost.
- Disable Default Opt-ins: Many checkouts have pre-checked boxes for things like premium support or data insurance. Uncheck these immediately.
- Credit Wallet Caution: If a provider encourages you to load a digital wallet, check the terms for a 60-day expiration. That is not credit; it’s a forced, time-limited discount that punishes infrequent travel.
For reliable connectivity, favor providers who present a single, all-inclusive price on the initial advertisement. For example, grabbing affordable eSIM plans for Canada is much easier when you find options that don’t hide extra costs for getting online.
The Unexpected Cost of Device Incompatibility
A phone that works perfectly at home can suddenly become a very expensive paperweight when faced with an incompatible eSIM profile. This isn’t technically a fee from the provider, but it functions as one because you pay for data you cannot use. Some service providers are highly technical about device requirements, often only supporting newer models that have specific hardware for eSIM technology.
If you try to install an eSIM on an unsupported device, you might encounter installation errors or immediate failure to connect. Here is where providers exploit the issue:
- Refusal of Refund: Many companies claim incompatibility is a user error or misunderstanding of device capability and refuse standard refunds.
- Processing Fees: If you contact support and they agree to cancel the order, they may still deduct a non-refundable digital processing fee from your refund amount.
Before you make any purchase, you must confirm your device’s eSIM compatibility. Look for a clear compatibility checker tool on the provider’s website. If the site is light on technical details and just shows you pictures of phones, walk away. You need assurance that your specific model will integrate correctly with their system. This preemptive check prevents you from paying for a wasted digital profile.
Conclusion
Avoiding hidden fees requires the same level of attention you’d give to a legal contract; you’ve got to read the fine print and habitually double-check your app settings to disable “Auto-Top Up” or silent renewals. In my experience, transparency isn’t just a nice perk; it is the absolute most valuable feature a provider can offer, far outweighing a low-ball initial price tag.
Before you tap that buy button, always verify that your plan uses a “First Connection” start date so you aren’t paying for data while you’re still on the tarmac at home. If you want a smooth experience without the “zombie” fees or speed throttling surprises, choosing a best eSIM for international travel from a reputable source ensures your connectivity remains as clear as the advertised price. Happy travels, and keep your data settings on a short leash!